Monday, 19 December 2011

Week 9


History of the Internet


Here’s a brief history of the Internet, including important dates, people, projects, sites, and other information that should give you at least a partial picture of what this thing we call the Internet really is, and where it came from. 

While the complete history of the Internet could easily fill a few books, this article should familiarize you with key milestones and events related to the growth and evolution of the Internet between 1969 to 2009.

1969: Arpanet

Arpanet was the first real network to run on packet switching technology (new at the time). On the October 29, 1969, computers at Stanford and UCLA connected for the first time. In effect, they were the first hosts on what would one day become the Internet.
The first message sent across the network was supposed to be "Login", but reportedly, the link between the two colleges crashed on the letter "g".
1970: Arpanet network
An Arpanet network was established between Harvard, MIT, and BBN (the company that created the "interface message processor" computers used to connect to the 
1971: Email
 Email was first developed in 1971 by Ray Tomlinson, who also made the decision to use the "@" symbol to separate the user name from the computer name (which later on became the domain name).


1984: Domain Name System (DNS)

1989: The proposal for the World Wide Web

1989 also brought about the proposal for the World Wide Web, written by Tim Berners-Lee. It was originally published in the March issue of MacWorld, and then redistributed in May 1990. It was written to persuade CERN that a global hypertext system was in CERN’s best interest. It was originally called "Mesh"; the term "World Wide Web" was coined while Berners-Lee was writing the code in 1990.


1998: Google!


Google went live in 1998, revolutionizing the way in which people find information online.
2004: "The" Facebook open to college students

2008: "Internet Election"

The first "Internet election" took place in 2008 with the U.S. Presidential election. It was the first year that national candidates took full advantage of all the Internet had to offer. Hillary Clinton jumped on board early with YouTube campaign videos. Virtually every candidate had a Facebook page or a Twitter feed, or both.
WHAT about THE FUTURE?

Week-8 Session 1

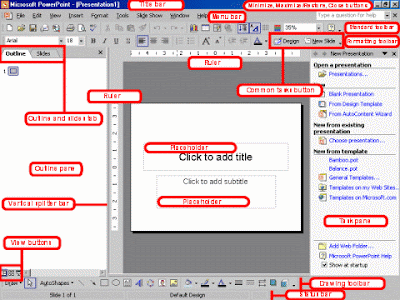
Power point
Originally designed for the Macintosh computers, the initial release was called "Presenter", developed by Dennis Austin and Thomas Rudkin of Forethought, Inc. In 1987, it was renamed to "PowerPoint" due to problems with trademarks, the idea for the name coming from Robert Gaskins. In August of the same year, Forethought was bought by Microsoft for $14 million USD ($27.1 million in present-day terms), and became Microsoft's Graphics Business Unit, which continued to develop the software further. PowerPoint was officially launched on May 22, 1990, the same day that Microsoft released Windows 3.0.
PowerPoint changed significantly with PowerPoint 97. Prior to PowerPoint 97, presentations were linear, always proceeding from one slide to the next. PowerPoint 97 incorporated the Visual Basic for Applications (VBA) language, underlying all macro generation in Office 97, which allowed users to invoke pre-defined transitions and effects in a non-linear movie-like style without having to learn programming
PowerPoint 2000 (and the rest of the Office 2000 suite) introduced a clipboard that could hold multiple objects at once. Another noticeable change was that the Office Assistant, whose frequent unsolicited appearances in PowerPoint 97 (as an animated paperclip) had annoyed many users, was changed to be less intrusive.
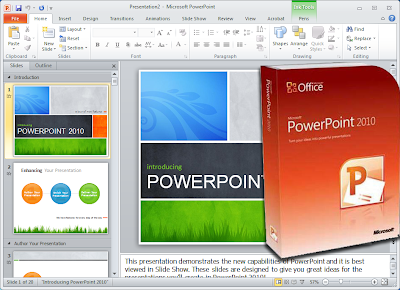
Microsoft PowerPoint 2010
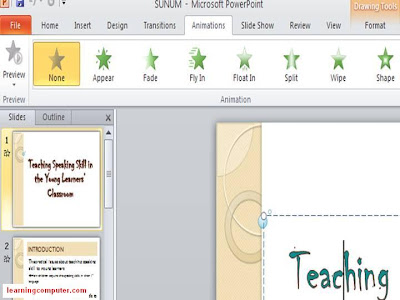
PowerPoint 2010 has changed from its predecessor. Screen Capturing has been introduced, allowing you to take a screen capture and add it onto your document. Also, you can now remove background images and you can add special effects, such as 'Pencil effects' onto pictures. Plus, new transitions are available. However, the ability to apply certain text effects directly onto existing text, seen in Microsoft Word is not available; a separate WordArt text box is required.
File formats
The binary format specification has been available from Microsoft on request, but since February 2008 the .ppt format specification can be freely downloaded.
In Microsoft Office 2007 the binary file formats were replaced as the default format by the new XML based Office Open XML formats, which are published as an open standard. Nevertheless, they are not complete as there are binary blobs inside of the XML files, and several pieces of behaviour are not specified but refer to the observed behaviour of specific versions of Microsoft product.

Session 1 included Introduction to Power Point(overview), Basic Ms, Power Point(Slides & views), Applying theme and background, Working with images and clipart, Screenshots and Transitions, Working with Word Art and Shapes, working with videos and bookmarking and finally Summary.
All these were just the basics of Power Point which is start of learning it.

 Our lecturer taught us how to insert images, audios, videos and design them. Usually our lecturer teach us in the beginning of class and gives us the task which is related to topic and gives us certain time to finish it.
Session 2
2nd session included just recap previous lessons, Smart Art illustrations, Rehearse and Record Slide Shows, Broadcasting a presentation, Hyperlink and Action buttons and Summary as well.
Week 8 – session 2
Presentation Skills: Microsoft Power Advanced

Session 2 included Introduction to Power Point(overview), Basic Ms, Power Point(Slides & views), Applying theme and background, Working with images and clipart, Screenshots and Transitions, Working with Word Art and Shapes, working with videos and bookmarking and finally Summary.
Learn more advanced techniques in PowerPoint such as working with slide masters, creating new design templates or themes, automate your presentations, rehearse the timings, copy or move slides between presentations and working with multiple computers.

Week 7


In this week, I've got plenty of new information about Microsoft Excel and how to use it.

In first session, we have learnt about Microsoft Excel basis
Cell basics
In general, basic cells and cell content in Excel is able to use calculating, analyzing , and organzing data.
Cell basics include:
  - Insert content, select cells, cell content and delete cells
  - Cut, copy and paste cells as well as drag,drop cells and fill cells using the fill handle.


After becoming aware of this, we did in class activity(approximately 5 minutes), namely we watched the video to learn about cells and cell content in Excel workbooks.
Then,briefly,lecturer expained about the ways of modifying columns, rows and cells. These ways are: change row height and column width, insert and delete rows and columns, wrap text in a cell, merge cells.
In addition, i became familiar about formating in excel. Formating in excel includes following commands: 1)change font and font size;2)use the bold,italic,and underline commands;3)Add a border;4)Change the font color and add fill color;5) Change horizontal and Vertical text alignment.

As a summary i can say that by now, i have been familiar already with these :

 *Cell basics including modifying and formatting Columns, Rows, and Cells
 *Saving and printing a worksheet
 *Working with basic functions
 *Sorting, outlining and filtering data
 *Formatting Tables.


In second session, i have strengthened my knowledge about Microsoft Excel
Sparklines
Firs of all, i've been introduced to Sparklines. As a rule, Sparklines are miniature charts that fit into a single cell.
Why we use sparklines? We use it, because they are ideal for situations where you just want to make the data clearer and more easy-catching. Also, they are ideal for situations where you want to represent the data in greater detail, and they are often better for comparing different data series.
There are 5 phases of using Sparklines:
 -Select the cells that you will need for the first Sparkline
 -Click the Insert tab. In the Sparkline, select Line. A dialog box will appear.
 -Make sure the insertion point is next to Location Range. Click the cell where you want the Sparkline to be.
 -Click OK. The Sparkline will appear in the document. Click and drag the fill handle downward.
 -Sparkline will be created for the remaining rows.

Pivot Table
Second of all, i've became aware of using pivot tables in Microsoft Excel. In fact, Pivot tables make the data in worksheets much more manageable by summarizing the data and allowing user to manipulate it in different ways. Likewise, Pivot tables can be beffiting when used with large, complex spreadsheets, but they can be used with smaller spreadsheets as well.
After that, watched tutorial video about using Pivot Tables as well as using filters,slicers, and Pivot Charts.
To tell the truth, by the time of this session i felt headache and i missed the summarizing part of lecture.


Activity
In third session, our class was fully covered by activity.
 Instuction to this activity was:
 *You need to do the exercise and mark will be awarded upon completion
 *You also need to complete the task given and email to your lecturer
 
 Requirements:
 *Referring to Activity sheet in our module and follow the instruction.
 *Save and Email exercises to your lecturer with the subject "FCC113 Microsoft Excel-'your name'" into one folder.
Time allocated: 55 minutes.

That activity was mainly about calculating the percentages,grades,total using different formulas and tools.
As a summary, this session will give an exposure to the me with tools that i can apply to enhance my learning process. Besides that, at the end of this session, i am able to create and develop my own document a using appropriate application software.
To be honest, that activity which has been held in third session was very easy in case of difficulty, because i've already known about using Microsoft Excel tools and formulas. Thus, I finished that activity within only 15 minutes.

Sunday, 18 December 2011

Week 6- Session 1 Word processing skills: MS Word Basic. Session 2 and 3: Word Processing skills: MS Word Advanced Add or remove titles in a chart

 Word processing skills: MS Word Basic
I would have never thought this week to be extremely beneficial in a way of enhancing and making the skills those have been gained in days of yore more durable than ever before. It is because this week we repeated and remembered some skills which we took out of the mind for a while.
This week was about the word processing skills, particularly, MS word basic.
The organization of the lesson was quite satisfactory.
It was as following:
Microsoft Office, Introduction to Microsoft Word, Getting started with Word, Text Basics, Formatting, Working with Graphic ,Finally, Summary.
Before moving to the topic teacher explained that Microsoft Office includes various programs
Then the introductory part was explained. According to that, Using Microsoft Word, user easily can change the shape, size color of text, shading, add tables pictures, charts and web addresses in documents.
In Addition, it was said that word is full featured word processing program that allows user to create many types of personal and business documents including flyers, memos, reports and etc.
In order to get started with Word we should go following link:
http://www.gcflearnfree.org/word2010
In sequence, word window was explained, According to that, Microsoft Window consist of variety components. This include the document window, Ribbon, Mini Toolbar, Shortcut menus and Quick Access Toolbar

The Microsoft Word 2010 screen
• When the Microsoft Word 2010 program loads, your screen will look something like this. 

Ribbon Tabs
• When you first start Microsoft Word, you normally see the Home tab displayed, as illustrated. This tab contains icons and other controls that are most commonly used within Microsoft Word, such as making text display as bold or underlined. You can also find more advanced options such as paragraph alignment, numbering and bulleting. Move the mouse pointer over some of the icons and get a feel for what options are contained within this tab. 


Insert

Click on the Insert tab and you will see commands and options relating to inserting items within your Microsoft Word document. Again, move the mouse pointer over the items and see what is available.

What is text formatting?
• You can format a document at different levels within Microsoft Word. The most basic level is called text formatting. This relates to formatting characters and words within a document and covers the font type, font size, font color and font attributes such as bold italic or underlining.

Word Processing skills: MS Word Advanced
Add or remove titles in a chart

To make a chart easier to understand, you can add titles, such as a chart title and axis titles, to any type of chart. Axis titles are typically available for all axes that can be displayed in a chart, including depth (series) axes in 3-D charts. Some chart types (such as radar charts) have axes, but they cannot display axis titles. Chart types that do not have axes (such as pie and doughnut charts) cannot display axis titles either.


Creating Mail Merge Documents:

Instructions.Things You'll Need
  1.Close all open Word documents and create a new one.
  2.Go to the Tools menu and select Mail Merge
  3.Select Create and then Form Letters, and then click the Active Window button.
  4. Click the Edit button and select the document you just created.
  5. Go to the Insert menu, choose the third Date and Time (month, date, year) choice and click OK.
  6.  Press Return four times and begin typing the contents of your letter with only the salutation followed by a colon (for example, "Dear:"); do not include the name or address of any of the people to whom you are writing.
  7.  As you write the letter, leave blank any place you want to fill in later with a name or other personal information.
  8. After you've written the letter, position the cursor where you want to insert the first "merge field," or item to be filled in later (probably the name after "Dear:"), and then click Insert Merge Field on the Mail Merge toolbar. Do this with each merge field until you've placed all of them in the correct position in the mail merge form letter.
   9.Save the letter as Merge Main Letter.
  10.  Go to "How to Set Up a Mail Merge Data Source in Microsoft Word" to learn how to set up the names and addresses to be merged into your letter.

Work with Hyperlink:

·         Hyperlinks: navigate from one web page to another
·         Hyperlinks have two basic parts:
a.       The address of the web page, email address, or other location that they are linking to
b.      The display text (or image).
Summary:
By the end of this session we have learnt:
·         Modifying Page Layout
·         Checking spelling and grammar Working with Lists, Breaks , Columns, Tables, and Hyperlinks
·         Working with Shapes, Styles
·         Using Mail Merge


Week 5. Seesion 1: Demonstrate the application of MS Windows computer operating system. Windows OS history, Microsoft Windows, Windows 7 aims, Upgraded from Vista/XP, Improvements from XP only, Windows 7, Anatomy of Windows 7, Aero, Taskbar, Search, Libraries, Gadgets, Additional tools in windows 7, Windows 7 requirements. Session 2 and 3:Windows 7 file management, Managing files and folders, Efficient file management, Finding files and folders, types of libraries, using search, Search options and features, A new Approach to Accessing content, Windows Special folders, Windows Special folders, system tool folder, System restore


Windows OS history

Microsoft released a number of Windows operating system ranging from Windows xx, NT, server from 1985 till now. The latest is  Windows 7, released in 2009. Windows 8 isn’t yet released.

Microsoft Windows
       Microsoft created the operating system, WINDOWS, in the mid-1980s.
       They have a version of the 

     operating system that is designed for the home user, and professional version, which is intended for the businesses
       The versions differ in the depth of networking, security, and multimedia support
       Windows is a proprietary software, which means that Microsoft has placed restriction on how people can use or copy the software


Windows 7 Aims
- decrease Start up and shutdown times by 20 seconds
- go to sleep and Resume faster
- use up less memory
- pop ip search result faster
- Reconnect to your Wireless Network more quickly
- Recognize USB devices faster
main elements of windows 7
- Aero view

- Taskbar
- Search
- Libraries
- Gadgets


Windows 7 Requirements

in order 


Windows 7 Aero
Windows Aero is the premium visual experience of Windows Vista. It features a translucent glass design with subtle window animations and new window colors.
Aero’s distinctive visual style combines the appearance of lightweight, translucent windows with powerful graphic advances. With Aero, you can enjoy visually appealing effects and appearance and also benefit from better access to your programs.


File Formats and Data Stores
In Windows 7, Windows Explorer makes file management and manipulation easier for the user in several way
The preview for your application's file type is more accessible with a new button that lets users show and hide the preview pane.
 Immersive visual stacks aggregate thumbnail images for file types in a view.
  Windows Explorer views show useful information based on properties written with your property handler.
         Document snippets and hit highlighting use your IFilter interface implementation to make searching and finding files easier.
 Context-menu verbs and commands are easier than ever to implement.
By implementing all of the appropriate format handlers for the items returned from your protocol handler, search results from your custom data store can be as rich as search results from files. Libraries are automatically created for your protocol handlers so users can scope their searches easily. And the logic for creating Libraries can be easily customized through the registry.


Tuesday, 22 November 2011

Week 4. Session 1: Basic concepts of Networking Session 2: Networking communication mediums Sesion 3: Types of netwerks: LAN, WAN, Peer-to-peer

Session 1. Basic networking Concepts


 Computer network:


A computer network is a group of more computers connected to each electronically. This means that the computers can "talk" to each other and that every computer in the network can send information to the others. Usually, this means that the speed of the connection is fast - faster than a normal connection to the Internet.


Network Components
There are three primary components to understanding networks: 1. Physical Connections; 2. Network Operating System; and 3. Application Component. 
The physical components are the network topology and network connecting devices, which include network interface cards (NIC), cabling, connections, and all other hardware to connect the computers.


Data communication:


Data communication refers to the transmission of the digital signals over a communication channel between the transmitter and receiver computers. Communication is possible only with wired and wireless connectivity of the computers with each other. All the computers, in the logically and physically networks have to follow the same rules known as Protocols such as TCP/IP, IPX/SPX and NETBEUI etc. Today, there are many computer networking technologies such as LAN, MAN, WAN, WLAN, ISDN, ATM, Frame Relay, X.25, Bluetooth, GPRS, CDMA and many others.


Analog and digital signal

The analog signal and digital signal are differ in their data format which they carry during the transmission. Let’s see the some difference in both. Analog signal are continues and digital signal is discrete, analog signal are continuously variable and digital signal are based on 1’s an d 0’s, The primary disadvantage of an analog signal is noise and Noise in digital signal is much easier to filter out, Sound waves are a continuous wave and as such are analog in the real world and in digital signal is used in computer which is used in every office, Analog signal required lesser bandwidth capacity and digital signal require greater bandwidth capacity.


Session 3: Network communication Mediums

Network Medium:

The typical fiber optic cable used for a fiber link segment is a multi-mode fiber cable (MMF) with a 62.5 micron fiber optic core and 125 micron outer cladding (62.5/125). Each link segment requires two strands of fiber, one to transmit data, and one to receive data. There are many kinds of fiber optic cables available, ranging from simple two-strand jumper cables with a PVC outer jacket material on up to large inter-building cables carrying many fibers in a bundle. The fiber connectors used on link segments are generally known as "ST" connectors. The formal name of this connector in the ISO/IEC international standards is "BFOC/2.5." The ST connector is a spring-loaded bayonet connector, whose outer ring locks onto the connection, much like the BNC connector used on 10BASE2 segments. The ST connector has a key on an inner sleeve and also an outer bayonet ring. To make a connection you line up the key on the inner sleeve of the ST plug with a corresponding slot on the ST receptacle, then push the connector in and lock it in place by twisting the outer bayonet ring. This provides a tight connection with precise alignment between the two pieces of fiber optic cable being joined.


Transmission medium:


 Physical path between transmitter and receiver
May be guided (wired) or unguided (wireless)
Communication achieved by using em waves
Characteristics and quality of data transmission
Dependent on characteristics of medium and signal
Guided medium
Medium is more important in setting transmission parameters


Wifi

Wifi, is a mechanism for wirelessly connecting electronic devices. A device enabled with Wi-Fi, such as a personal computer, video game console, smatphone, or digital audio player, can connect to the Internet via a wireless network access point. An assess point (or hotspot) has a range of about 20 meters (65 ft) indoors and a greater range outdoors. Multiple overlapping access points can cover large areas.


Sunday, 13 November 2011

Week 3. Standard Packages: Overview and typical installation procedures

Application Software

The main aim of this class is to find out more information about application software.As we search about this, we will be able to find out that Application Software consists of programs designed to makke users moreproductive and effevtive or assist with personal tasks.


Application software is the general designation of computer programs for performing user tasks. Application software may be general purpose  or have a specific purpose . Application software contrasts with system software, a generic term referring to the computer programs used to start and run computer systems and networks


Forms of application software:


There are different forms of application software, It can be illustrated with some examples as following:


1. Packaged software
2. Custom software
3. Web application
4. Freeware
5. Shareware
6. Open sourse software
7. Public domain software


What is Software Update?


Answer to this question is that Software Update is a free software client designed to inform you of available software updates for your computer, so as to keep your software up-to-date. Software Update scans your computer and notify you if there is a program hasn't been updated to the latest version. It offers you a link to update software and other related information.


Why Need to Update Software as Much as Possible?


You may not always pay attention to updating software installed on your computer. Or you may think software update is not necessary as you only use certain functions and don't care to update at all. Actually, software updates often provide patches, which fixed software incompatible bugs and improved software performance to make your software more secure and reduce conflict. Software Update alerts you and provides you with software up-to-date information immediately if there is one available.


Software Usage


A good rule of thumb is to install one software package for each computer, unless the terms of the license agreement allow for multiple use of the program. Some software publishers' licenses do allow for "remote" or "home" use of their software. If you travel or telecommute, you may be permitted to copy your software onto a second machine for use when you are not at your office computer. Check the license carefully to see if you are allowed to do this.


Tuesday, 25 October 2011

Week 3 - Session 2. Programming Language: Machine, Assembly, High-Level Language


Purpose; Today our main objectives are to find out more further information about what is program, programming language, programming and who is programmer.


Programming language is a set of words, numbers, symbols which permits programmer who uses computer to communicate instructions to a computer and it serves as a tool to write or create programs. Moreover, It is a unique language to connect programmer and computer

Types or PL
There are main two types of computer languages
1. Low-level language
2. High-level Language

In turn, Low-level language shows following characteristics namely, they are machine dependent language, tedious and time-consuming and each instruction represents a single machine instruction
The next one High-level language is machine in dependent language, more user friendly and every instruction can indicate different and several machine instructions.


1.Low- level language has two types Machine (the first generation) Language and Assembly language (the second generation)


2.High-level languages -s more powerful than assembly language, allows user to work more English-like Environment and it includes 3 kinds as following, namely the third, fourth and fifth generation languages


Generations of programming languages

The first and second generations: We start out with the first and second generation languages during the period of 1950-60, which to many experienced programmers will say are machine and assembly languages. Programming language history really began with the work of Charles Babbage in the early nineteenth century who developed automated calculation for mathematical functions. Further developments in early 1950 brought us machine language without interpreters and compilers to translate languages. Micro-code is an example of the first generation language residing in the CPU written for doing multiplication or division. The second generation of programming language like AUTOCODER, SAP and SPS

The third-generation: Throughout the early 1960's till 1980 saw the emergence of the third generation programming languages. Languages like ALGOL 58, 60 and 68, COBOL, FORTRAN IV, ADA and C are examples of this and were considered as high level languages. Most of this languages had compilers and the advantage of this was speed. Independence was another factor as these languages were machine independent and could run on different machines. The advantages of high level languages include the support for ideas of abstraction so that programmers can concentrate on finding the solution to the problem rapidly, rather than on low-level details of data representation


The Fourth generation: Features evident in fourth generation languages quite clearly are that it must be user friendly, portable and independent of operating systems, usable by non-programmers,  which was not possible using COBOL or PL/I. Standardisation however, in early stages of evolution can inhibit creativity in developing powerful languages for the future. Examples of this generation of languages are IBM's ADRS2, APL, CSP and AS, Power Builder, Access.


The fifth generation: The 1990's saw the developments of fifth generation languages like PROLOG. This means computers can in the future have the ability to think for themselves and draw their own inferences using programmed information in large databases. Complex processes like understanding speech would appear to be trivial using these fast inferences and would make the software seem highly intelligent